Mold Remediation is the process of restoring building materials and items after a severe water damage event. It involves a series of steps, most notably the removal of affected materials and the use of microbial sprays to prevent re-growth.
First, porous materials like drywall, carpets, and insulation are removed from the affected area. These are bagged and disposed of, while non-porous surfaces are vacuumed and scrubbed to remove spores. Click Here for more details.
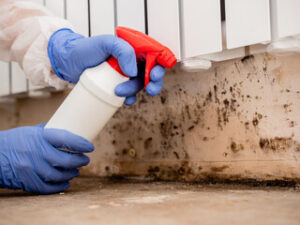
The first step in any mold remediation is to clean the area. The mold professionals use commercial cleaning solutions to clean surfaces and wipe down any items within the affected room. They also spray the mold areas with a biocide, which is an EPA-approved liquid that kills mold spores. It takes time for the biocide to work, so the workers typically leave the rooms and wait a few hours.
If the mold affected porous materials like drywall, carpeting, or fabric, they need to be removed and discarded. Non-porous materials such as metals, wood, and ceramic tiles can stay. If they are contaminated, the professionals may spray them with biocide and scrub them to kill any remaining mold spores.
Once the cleaning and spraying are complete, the mold professionals will seal the affected areas to prevent the spread of mold spores to unaffected rooms. They may also close any windows, doors, or vents in the affected rooms to further limit spore movement.
During the containment process, it is important to restrict access to the affected areas for children, pets, and anyone else not involved with the cleanup. This is because the chemicals used in this stage can be harmful if they come into contact with sensitive areas of the body. It is also important to close off any air conditioning systems or ventilation systems in the affected rooms, as recycled air can carry mold spores into other areas of the home or business.
Several days before the remediation company arrives, it is recommended that you sequester any house pets in a separate area away from the mold affected rooms, move cars off of the driveway or garage, and clear a wide path to the entrance of the affected rooms. This will give the professionals space to work without contaminating any other parts of your property. If you have to be present for the remediation, then it is best to wear a mask, goggles, and protective clothing while working near any visible mold growth. The mask will help to filter out any harmful microbes in the cleaning solution.
Deodorizing
When left untreated, mold can eat through building materials like floorboards, drywall, carpet, and wallpaper. It can also contaminate air quality and cause health problems. Some of the common symptoms caused by mold are runny nose, sneezing, and skin rash. But some individuals can suffer from more severe reactions including shortness of breath, coughing, headaches and migraines. Molds can also produce mycotoxins, which are potent toxins that can have long-term effects on health.
Remediation professionals will first spray an EPA-approved biocide on the affected areas to eradicate the fungi. Once the biocide is dry, they will clean the surfaces with HEPA-approved vacuums to remove moisture and any remaining mold spores that may be left behind. They will also damp-wipe and dry the surfaces, then paint them with whitewash or a special mold-resistant coating to protect them from further outbreaks.
During this process, it’s important that the remediation team is wearing appropriate personal protective equipment (PPE) to prevent inhaling or coming into contact with mold spores. Depending on the extent of the contamination, remediators may wear limited-use paper overalls, or full body suits made from a breathable material such as TYVEK. They’ll also wear face masks to avoid exposing their faces to spores and wear rubber gloves to protect their hands.
They will also use fans to circulate the air in the contaminated area and to speed up the drying process. They’ll also seal and bag any items that are affected by mold, and dispose of them according to EPA standards.
This is one of the most critical steps in the entire process because it can help ensure that the mold odors are gone for good. Remediation companies use deodorizing techniques that rely on the natural chemistry of ozone to break down and neutralize the odor molecules. This step takes a few days to complete, but it can be longer in particularly foul cases. The duration of the process will depend on the strength of the odor, the size of the area affected by it, and the level of contamination. If the odor is still present after the process, it’s important to look into finding and fixing the root cause of the problem.
Disposal
When contaminated materials are removed, they must be handled carefully. If they are not disposed of properly, they can re-contaminate the area. This includes ductwork, wood beams and other structural elements. In some cases, a professional mold remediation company may need to use a hazardous waste company to transport and dispose of large quantities of compromised building materials.
Porous materials that are infested with mold, such as drywall, cellulose wall board, insulation and fabric covered furniture, must be removed and discarded. Non-porous materials that are only mildly affected by mold can usually be cleaned, but they must be completely dry to prevent further damage and re-infestation. Depending on the amount of mold and the material, the remediation process can take several days.
It is important to close off the mold area from unaffected areas. Mold spores can travel through open vents, air ducts and other spaces in the house. These spores can then be inhaled by other family members and can cause a variety of health issues. This is particularly true for infants, children and people with respiratory conditions such as asthma.
A limited containment area should be maintained by blocking all supply and return air vents in the room. This will keep contaminated spores from traveling throughout the home. During this time, the area should be kept as dry as possible using fans or dehumidifiers. This can also speed up the cleanup and deodorization process.
Before the mold removal crew arrives, it is important to clear a path through the house to the moldy area. This can include moving furniture and other items, sequestering pets in a separate area of the house, and clearing a wide access path from the doorway through the area to be cleaned.
It is important to wear protective gear while working on a mold remediation project. This should include goggles or eye masks, a filter face mask, rubber gloves and long sleeves. This will help to avoid contact with the mold spores and any mycotoxins they might release during the cleanup process. Also, children should be kept out of the work areas.
Testing
When mold is detected, testing is crucial for determining the scope of the problem. It also allows a property owner to know whether the problem has been addressed adequately. A test gives a snapshot estimate of the amount and type of mold in a particular environment at a given point in time. This means that a single sample may be very different from another one taken at a later date.
Mold testing can be done in a number of ways. The simplest is a visual examination. This consists of taking photographs or notes of the problem areas to document their extent. It is usually combined with a moisture reading to determine how moist the affected area is. A mold inspector can also perform a swab test which involves collecting a small bit of material from the suspected area using an applicator with a tip coated in a reagent. This swab is then inserted into a laboratory for analysis.
The results of a swab test can be determined by comparing the result to a standard range. This allows the inspector to determine if there is an excessive presence of a specific species of mold and if remediation steps are needed to address it. Other methods for testing include a culture test which grows a small portion of the suspect mold in a laboratory and a DNA test. The latter is a newer technology that analyzes a sample of the mold for its genetic makeup.
If an individual has complained of symptoms such as runny nose, coughing or headaches that cannot be attributed to another cause, it is a good idea to have the home or office tested for mold. If the inspection reveals a problem, removing the mold and correcting the source of moisture are essential to prevent future problems.
Once a mold remediation is complete, clearance testing can be performed to ensure that the area has been returned to Normal Fungal Ecology. The experts performing the clearance testing will take moisture readings, look for visible cues and conduct airborne tests of spores outside and within the remediated area to make sure the process was effective.